
Soundproofing 101: Reducing Sound Flanking
Posted by BIP / Resourced from The Green Glue Company on 16th Jan 2019
Sound Flanking is a common soundproofing concept that many contractors and homeowners tend to overlook when noiseproofing rooms, walls, ceilings etc.
What is Sound Flanking? Sound Flanking (flanking noise) is sound that transmits between spaces indirectly, going around or over, rather than directly through the main separating structure (wall/ceiling/floor). This can allow sound to transmit between spaces even though the main separating structure itself provides good acoustic insulation.
To visualize flanking think of sound or noise as water and think of a wall as a dam trying to keep water from going past. The dam is solid and water cannot directly pass through it, however the dam only extends so many feet and the water flows at the ends of the dam and makes its way behind it.
Noise finds all sorts of pathways to travel through, some direct and others indirect. It’s those indirect pathways that are referred to as flanking noise, and it’s an important concept to consider when renovating or remodelling your home or office.
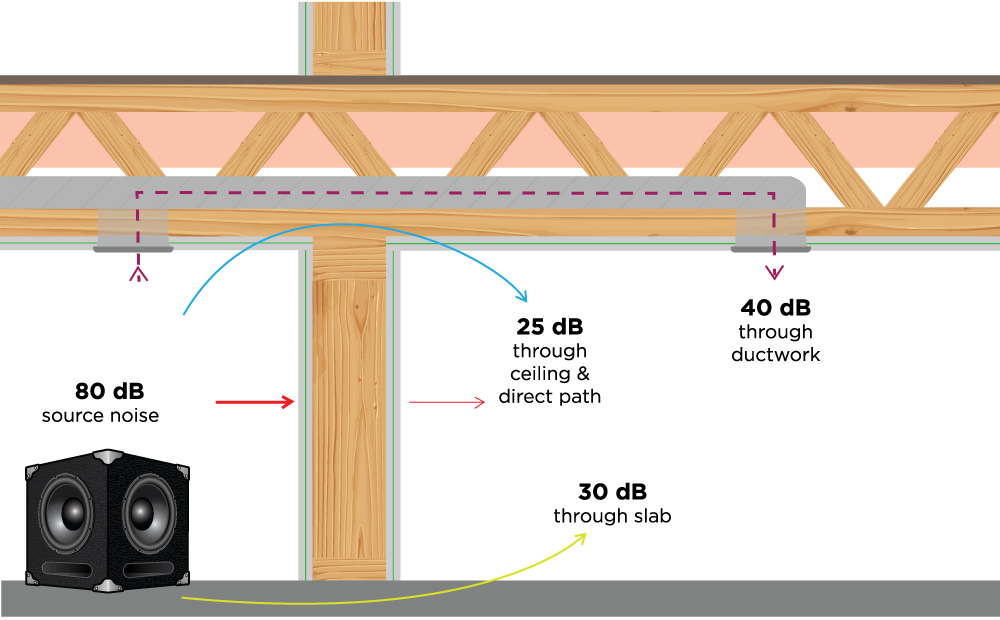
The diagram above illustrates how noise travels from one room to another. Direct soundwaves are represented by the red arrows – the straight line from the noise source (subwoofer in this example) through the wall to the adjoining room. But even more sound enters the adjoining room through indirect pathways: floors, airspace in ceiling joists, ductwork, etc. To reduce the amount of noise traveling between rooms, consider creating a specific sound plan just for your room. For example, you could use staggered or double studs, or decoupling such as Green Glue Noiseproofing Clips.
If you are a musician or in the voice recording industry, you may need a higher level of soundproofing. In this scenario, consider designing a “room within a room.” This is where a double row of studs are combined with separate ceiling joists, effectively eliminating practically all mechanical connections between the room and the rest of the structure.
Here are some tips on how you can keep flanking noise from ruining your home renovation plan:
Doors Are Sound "Doorways": Doors are usually a weak link in a soundproofing plan. Even if a door does not directly connect rooms, sound can travel through the door and into the hallway and adjoining rooms.
- Door Mass: Just like walls and ceilings, mass is important for doors as well. A solid-core door with weather-stripping seals or an exterior grade door are the preferred way to stop door sound leakage.
- Add Mass & Damping: If buying a new door is not in your budget you can always add a layer of MDF and Green Glue Noiseproofing Compound to a standard interior grade door can greatly boost door performance.
- Air-Lock Doorway: If you have a door which connects two rooms directly, consider building an 'Air-Lock Doorway', which has two doors back to back with an air space between them. If both doors are properly sealed with weatherstripping you will have an air-lock which isolates sound effectively.

Electrical Outlets/Switches: Doors are obvious areas for Sound Flanking, however those electrical outlets and switches are like tin can string phones to the adjacent room.
- No Back to Backs: Make sure that outlets/switches are never installed back to back in the same wall cavity. If they are, make sure to move one of them over one stud to sever the direct sound path.
- Seal Them Up: It doesnt matter how "soundproof" a wall is if you have holes in it. Electrical boxes are basically holes in your wall, so we highly recommend sealing these holes up.
- Putty Pads: Sound Blocking Putty Pads are "Play-Doh" like sheets of putty which can be formed around the back of an electrical box. Putty Pads can easily be added to boxes in walls that do not have drywall on atleast one side. If your walls are sealed but you will be adding additional layers of drywall, cut out a large hole around the box, install the putty pad, and then reinstall the cut piece of drywall (caulk the cuts and any gaps).
- Wall Plate Gasket Sound Seals: If installing the aforementioned putty pad is not possible or if you want to create an even more sound tight electrical box you can easily install Wall Plate Gasket Sound Seals. These neoprene rubber seals help create an airtight seal around the wall plate of outlets and light switches.
Listen to your Ducts (Quack): Another easy path for noise to travel from room to room is behind that vent grille. Ductwork is one of the more difficult sound passages to resolve. Finding out if the ductwork is a weak spot is easy. Try to talk to someone in another room through the ductwork grilles. If you can easily converse you know this is an issue for your rennovation.
- Insulate Your Ducts: An easy fix is to use insulated or "lined" ductwork. Sheetmetal ducts can be lined with fiberglass duct liner which will absorb sound that would normally bounce around inside the duct.
- Add Turns: Add 90° turns to your lined duct work. The air will still flow through the ductwork however sound likes to travel in a straight line. Every time you turn the sound will be forced to hit the side of the duct which will allow the insulation to absorb the sound.
Float The Floor: Using floating floors can be effective at reducing impact noise. This is a floor that has a “floating” surface on top of a resilient layer like rigid fiberglass, rubber mats, etc. The floating surface could be layers of wood, gypsum, or other material.
|
|
|
|


