The Best Soundproof Ceiling Options with Green Glue Noiseproofing Compound
Posted by BIP on 28th Mar 2016
This article will explain the range of options of soundproofing a floor/ceiling structure from underneath, as well as how to use Green Glue for soundproofing. The reason we are focusing on installing soundproofing from below is that most noise complaints come from "ceiling side" and access to the "floor side" of a floor/ceiling is usually restricted. We will start out with the ultimate ceiling and work our way down to less complex and easier to install options, such as soundproofing existing ceilings. In all Green Glue ceiling soundproofing projects, attention to detail is one of the biggest keys and we will give general instructions for each structure.
Noise Complaints from the Ceiling Side:
Footsteps: This is the most common complaint from the bottom tenant as a poorly constructed ceiling/floor will easily transmit footsteps.
Other Impact Noise: This can be as simple as a dropped fork in the dining room, or an ambitious basketball star dribbling on the living room floor.
Airborne Noise: This is basically non-impact noise most commonly voices and music.
THE ULTIMATE GREEN GLUE CEILING |
|

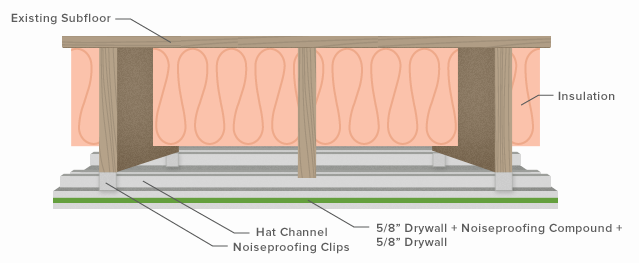
The ultimate soundproofed ceiling is shown in the image below.
- This installation requires the removal of the existing drywall on the ceiling
- The addition of two layers of drywall with Green Glue between the joists
- Addition of an insulation layer within the ceiling cavity
- Whisper Clips with Hat Channel to isolate the ceiling
- The addition of two layers of drywall with Green Glue in between

ULTIMATE GREEN GLUE CEILING INSTRUCTIONS:
STEP 1: Remove all existing drywall from the ceiling, if there are budget constraints, try to remove the drywall as neatly as possible so it can be reused on the sub-floor in Step 3.
STEP 2: Measure the spacing between floor joists, and cut drywall sheets into pieces of that width (use all of the drywall removed in Step 1 if possible).
STEP 3: Apply Green Glue Noiseproofing Compound to the back of the drywall sheet and screw it into place between the joists. (Make sure to check the length of the screws to prevent going through the floor above). Repeat this step until the entire sub-floor is covered with the first layer of drywall.
STEP 4: Use Acoustic Caulk to seal up any gaps between the first layer of drywall and the floor joists (see pink spots in the image above)
STEP 5: Repeat Step 3 & Step 4 so the sub-floor now has two layers of drywall with Green Glue directly underneath it. Make sure to stagger the drywall joints for optimal results.
STEP 6: Add insulation to the cavity.
STEP 7: Install Green Glue Whisper Clips to the floor joists. CLICK HERE for instructions on installing Whisper Clips.
STEP 8: Clip Hat Channel into the Whisper Clips. CLICK HERE for instructions on installing Hat Channel.
STEP 9: Install 5/8" Drywall directly to the hat channel making sure not to accidentally screw into a joist above or directly into a Whisper Clip (referred to as short circuiting).
STEP 10: Apply Acoustic Caulk to the perimeter of the ceiling drywall and the existing walls to block any air gaps.
STEP 11: Apply Green Glue Noiseproofing Compound to layers of 5/8" drywall and install the second layer of drywall to the ceiling, making sure to screw only into the hat channel and overlapping the joints of the first layer.
STEP 12: Repeat Step 10
STEP 13: Spackle, Sand, Paint, and you are finally done.
KEY PERFORMANCE:
DAMPING: By adding two layers of drywall with Green Glue directly to the sub-floor, we are able to dampen the vibrations of the floor above as best we can directly at the source (from underneath).
DECOUPLING: We also decouple the new ceiling from the floor by hanging the drywall from the hat channel and Whisper Clips. This method of decoupling will stop a good amount of the direct transmission of vibrations to the ceiling below.
ABSORPTION: The addition of insulation inside the cavity is always a big plus in helping absorb airborne noise from passing through the air cavity.
ADDITIONAL MASS: By adding two layers of drywall to both the sub-floor and two layers of drywall to the ceiling, this structure now has significantly more mass.
As you can see, this soundproof ceiling is elaborate and labor intensive, but we start with this ultimate ceiling to show you all of the available options are with Green Glue products. We can take the principles of this ceiling and see which we should use on your specific ceiling within your project budget. Some customers decide to skip Step 5 and only have one layer of drywall and Green Glue underneath the sub-floor, which saves some time and money.
ISOLATED GREEN GLUE CEILING |
|

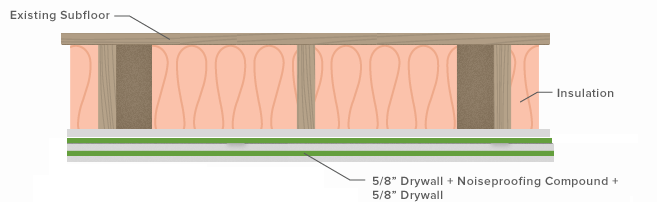
The Isolated Green Glue soundproofed ceiling is shown in the image below.
- This installation requires the removal of the existing drywall on the ceiling
- Addition of an insulation layer within the ceiling cavity
- Whisper Clips with Hat Channel to isolate the ceiling
- The addition of two layers of drywall with Green Glue in between
ISOLATED GREEN GLUE CEILING INSTRUCTIONS:
STEP 1:
Remove all existing drywall from the ceiling.
STEP 2: Add insulation to the cavity.
STEP 3: Install Green Glue Whisper Clips to the floor joists. CLICK HERE for instructions on installing Whisper Clips.
STEP 4: Clip Hat Channel into the Whisper Clips. CLICK HERE for instructions on installing Hat Channel.
STEP 5:
Install 5/8" Drywall directly to the hat channel making sure not to
accidentally screw into a joist above or directly into a Whisper Clip
(referred to as short circuiting).
STEP 6: Apply Acoustic Caulk to the perimeter of the ceiling drywall and the existing walls to block any air gaps.
STEP 7: Apply Green Glue Noiseproofing Compound
to layers of 5/8" drywall and install the second layer of drywall to
the ceiling, making sure to screw only into the hat channel and
overlapping the joints of the first layer.
STEP 8: Repeat Step 7
STEP 9: Spackle, Sand, and Paint.
KEY PERFORMANCE:
DECOUPLING: We decouple the ceiling from the joists by hanging the drywall from the hat channel and Whisper Clips.
This method of decoupling will stop a good amount of the direct
transmission of vibrations to the ceiling below because they are now
isolated from each other.
ABSORPTION: The addition of insulation inside the cavity is
always a big plus in helping absorb airborne noise from passing through
the air cavity.
ADDITIONAL MASS: By adding two layers of drywall to the
ceiling, this structure has more mass.
DAMPING: The layer of Green Glue Noiseproofing Compound between the two layers of drywall will provide the element of damping to the new ceiling.
This soundproof ceiling benefits from being decoupled from the floor joists above and stops most of the transmission of impact noise from the floor above. This ceiling lacks the damping qualities of the ultimate ceiling before it, but if the noise issue is reverse (coming from below) this may be your best option. This type of ceiling is very popular in basements where we are trying to prevent noise from a home theater from disturbing the first floor.
GREEN GLUE DOUBLE LAYER CEILING |
|

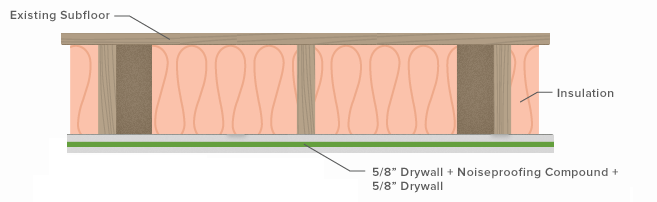
The Green Glue Double Layer soundproofed ceiling is shown in the image below.
- This installation does not require the removal of existing drywall, although insulation is recommended
- Optional addition of an insulation layer within the ceiling cavity
- Adding two additional sheets of drywall with Green Glue in between.
GREEN GLUE DOUBLE LAYER CEILING INSTRUCTIONS:
Optional: Remove existing drywall to add insulation if the ceiling is not already insulated.
STEP 1: Apply Green Glue Noiseproofing Compound
to a layer of 5/8" drywall and install the second layer of drywall to
the existing drywall. Make sure to stagger all joints.
STEP 2: Repeat Step 1 so there are three layers of drywall with Green Glue in between.
STEP 3: Apply Acoustic Caulk to the perimeter of the ceiling drywall and the existing walls to block any air gaps.
STEP 4: Spackle, Sand, and Paint.
KEY PERFORMANCE:
ABSORPTION: The addition of insulation inside the cavity is always a big plus in helping absorb airborne noise from passing through the air cavity.
ADDITIONAL MASS: By adding two layers of drywall to the existing ceiling (3 layers total), this structure has significant mass.
DAMPING: The two layers of Green Glue Noiseproofing Compound between the three layers of drywall will provide the element of damping to the new ceiling.
This ceiling lacks the isolation element that exists in the first two ceiling structures. Because the ceiling is not decoupled from the floor, vibrational noise will easily transmit through the floor joists. The Green Glue in conjunction with additional mass (3 layers of drywall) will stop most airborne noise and dampen some of the vibrational noise from above. This ceiling option may not stop all of the impact noise from above but it give you a less expensive, easier to install alternative.
GREEN GLUE SINGLE LAYER CEILING |
|

The Green Glue Single Layer soundproofed ceiling is shown in the image below.
- This installation does not require the removal of existing drywall, although insulation is recommended
- Optional addition of an insulation layer within the ceiling cavity
- Adding an additional sheet of drywall with Green Glue.
GREEN GLUE SINGLE LAYER CEILING INSTRUCTIONS:
Optional: Remove existing drywall to add insulation if the ceiling is not already insulated.
STEP 1: Apply Green Glue Noiseproofing Compound
to a layer of 5/8" drywall and install the second layer of drywall to
the existing drywall. Make sure to stagger all joints.
STEP 2: Apply Acoustic Caulk to the perimeter of the ceiling drywall and the existing walls to block any air gaps.
STEP 3: Spackle, Sand, and Paint.
KEY PERFORMANCE:
ABSORPTION: The addition of insulation inside the cavity is always a big plus in helping absorb airborne noise from passing through the air cavity.
ADDITIONAL MASS: Adding an extra layer of drywall adds some mass to the structure, however in the overall picture this is limited at best.
DAMPING: The single layer of Green Glue Noiseproofing Compound between the drywall will provide the element of damping to the new ceiling.
This ceiling is far from the ultimate soundproofed ceiling however it is a relatively inexpensive and easy addition that will stop a good portion of airborne noise and slightly muffle some impact noise from above.
ADDITIONAL BLOG POSTS RELATED TO THIS ONE:
Keys To Wall Soundproofing: Lesson 1 Decoupling
Green Glue Can Help You Easily Noiseproof Your Apartment Walls
Should I Use Green Glue Tubes or Pails?
What is Green Glue Noiseproofing Compound and How Does It Work?
Size of Hat Channel For Use With Green Glue Noiseproofing Whisper Clips
How to Properly Install Green Glue Noiseproofing Whisper Clips
Best Soundproof Ceiling Options with Green Glue
Comparing Green Glue to QuietRock